Ansible is a configuration and multi-node deployment tool. In contrast to other Configuration Management Software (particular Chef, Puppet…) Ansible manages nodes over SSH. This is one of the brilliant decisions I like in Ansible. First of all, it makes Ansible a push-based system, and secondly as a fact it does not need any daemons or programs to run or be installed on the managed nodes.
This makes Ansible minimal in nature. It seems to be understood by Ansible maintainers that such tools should not impose additional dependencies on the managed environment. However controlled nodes must have Python 2.6 or 2.7. -which is pre-installed on most popular distributions (Debian, Ubuntu, RHEL, Centos…) however this might not be perfect as it could be. Anyway, it’s not show stopper 1.
An additional benefit is that Ansible provided facilities for ad hoc task execution. Besides that, it has Low learning curve. But let’s look into some details, to see it, beginning with the installation of Ansible on the managing node (e.g. your laptop).
##Installation Since Ansible 2 is released I will use that latest release. Below two installation methods are shown
Ansible out of Package
Tested on Xubuntu laptop
sudo apt-get install software-properties-common
sudo apt-add-repository ppa:ansible/ansible
sudo apt-get update
sudo apt-get install ansible
Ansible from Source
Since PPA’s are not supported everywhere below you’ll find a more generalized way to install Ansible. Tested on LDME (Debian 8)
sudo apt-get update
# those packets exist also as RPM and other
sudo apt-get install python-pip python-dev git -y
sudo pip install PyYAML jinja2 paramiko
#No clone ansible repo
git clone git://github.com/ansible/ansible.git --recursive
cd ./ansible
#And install
cd ./ansible
#Sourcing bash into the current shell
source ./hacking/env-setup
Last line source ./hacking/env-setup enables2 Ansible in your current shell therefore it make sense to put this part into ~/.bashrc otherwise you need to execute every time for every new bash shell.
Installation test
$ ansible --version
ansible 2.0.1.0
  config file = /etc/ansible/ansible.cfg
  configured module search path = Default w/o overrides
Interesting here we see what ansible.cfg is used. In this case, it’s the default one.
Basics Walk-through
Consider we are into the new project. Let’s create hosts file with following content:
[test]
localhost ansible_connection=local
And now let’s try out our first Ansible command
$ ansible -i hosts -m ping all
# prints:
localhost | success >> {
    "changed": false,
    "ping": "pong"
}
As you see, we just successfully pinged the first host - localhost.
Option -i specifies inventory host path (default=hosts) or comma separated host list. And -m defines module name to execute here ping (default=command).
Modules are a very important part of Ansible. I don’t want to go too much into the details of why modules are so important at this point. But keep in mind that in the end, every Ansible task is defined by some Ansible module and there are a lot of modules already shipped with Ansible.
Module ping will attempt to remotely connect to the machines using your current user name, just like SSH would. To override the remote user name, just use the -u parameter to become root after that use -b. so e.g.
# ping as bob
$ ansible all -m ping -u bob
# ping as bob then become root
$ ansible all -m ping -u bob -b
If -i is not specified, the default hosts location is used: /etc/ansible/hosts. I would like to change it. For that i also add new file ansible.cfg to my project directory.
[defaults]
inventory       = hosts
This overwrites the default config, and I define inventory, a place where host definitions live, to be in the current project directory.
This declares the default location of the host file to be in the working directory.
So now I can use ansible not providing hosts file. Further, it might be useful to know what options are possible to be configured.
Since the default module is module command that executes any command on target machines we can use execute ad hoc command with Ansible like:
$ ansible all -a "/bin/df -h"
This one applies df -h on all hosts. Option -a is used to provide module arguments, in this case, the command to be executed.
To make it more interesting I’ve just created a new GCE(/google-compute-engine/) micro instance with IP 146.148.6.234. I will add it to a host list to the group [web]
[test]
localhost ansible_connection=local
[web]
146.148.6.234
Execution of the same command will be executed on this host too now.
Inventory
Ok, now we know how easy it is to start with the first commands before we try more complex scenarios, we need to know, that host file, in this case, defines so called Inventory, even if it still a very simple example of inventory for now. Inventory files are defined in INI file format and describe
- hosts
- groups
- variables
I will not go into details here, you can look up more details later as your inventory starts to grow.
Ansible Playbooks
We already saw examples of ad-hoc commands. The next logical step is Ansible Playbooks. Playbooks describe a set of steps that should be applied on managed nodes. In other words if
Ansible modules are the tools in your workshop, playbooks are your design plans.
Let’s create the first Playbook for our new box, that when played will one package via Debian packet manager apt.
# web.yml
---
- hosts: web
  user: bob

  tasks:
    - name: Update apt cache
      apt: update_cache=yes
      become: yes

    - name: Install required packages
      apt: name=mc
      become: yes
This Playbook consists of two tasks and a I think is good understandable without much explanation. The host group is web, ssh user bob should do two tasks. First task updates apt cache, then installs package mc. To play that playbook, we use the command ansible-playbook with the only argument that is the playbooks file name.
$ ansible-playbook web.yml

PLAY ***************************************************************************

TASK [setup] *******************************************************************
ok: [146.148.6.234]

TASK [Update apt cache] ********************************************************
ok: [146.148.6.234]

TASK [Install required packages] ***********************************************
changed: [146.148.6.234]

PLAY RECAP *********************************************************************
146.148.6.234              : ok=3    changed=1    unreachable=0    failed=0
Default execution strategy applies one task to the selected host and whenever the node is finished, goes to the next task. A we see Setup task is executed first. Then apt cache is updated and finally new package is installed and Ansible report this a change=1
Facts
Before any changes are applied to target hosts Ansible collects information about the hosts. Particularly it collects information about
- Hardware
- Operation system
- Network interfaces
This is done by core module setup that is always executed first. Of course, we can execute it any time to see available facts about nodes.
ansible -m setup web
Roles
I hope now you have the first impression of Ansible, but let do something more serious and learning about the Ansible Roles concept. Let’s install Nginx and show the custom page on the newly created Google Cloud Instance.
First ansible-galaxy init helps us to create Nginx role skeleton.
$ ansible-galaxy init nginx -p roles
- nginx was created successfully
We just created a role nginx directory structure. Since Ansible is built by convention over configuration principle, we get the following file structure.
$ tree
├── roles
│   └── nginx
│       ├── README.md
│       ├── defaults
│       │   └── main.yml
│       ├── files
│       ├── handlers
│       │   └── main.yml
│       ├── meta
│       │   └── main.yml
│       ├── tasks
│       │   └── main.yml
│       ├── templates
│       └── vars
│           └── main.yml
In this example, we will only use the most important parts of its structure
- tasks
- handlers
- templates
But first, let us define the role file webserver.yml
---
- hosts: web
  become: yes

  roles:
    - nginx
It simply says install role nginx on host group web and become superuser while executing tasks.
Role Tasks
The tasks of the role are defined under the /role/nginx/taks directory
├── roles
│   └── nginx
│       ├── tasks
│       │   └── main.yml
in our example, all of them are going to main.yml which is the entry point for role task by convention.
Let’s open main.yml and define needed tasks inside:
---
# tasks file for nginx
- name: Update apt cache
  apt: update_cache=yes

- name: Install package nginx
  apt: name=nginx

- name: Start nginx service
  service: name=nginx state=started

- name: Delete default nginx site
  file: path=/etc/nginx/sites-enabled/default state=absent
  notify: reload nginx

- name: Create default nginx config
  template: src=nginx.conf.j2 dest=/etc/nginx/sites-enabled/ansible owner=www-data group=www-data
  notify: reload nginx

- name: Create index.html file
  template: src=index.html.j2 dest=/usr/share/nginx/html/index.html owner=www-data group=www-data
Several interesting new moment are shown here. notify triggers handlers and template copies templates to target hosts as files.
Handlers
In our example handler with the name reload nginx is called by notifying. So we need to define the handlers folder in main.yml
#roles/nginx/handlers/main.yml
---
# handlers file for Nginx

- name: reload nginx
  service: name=nginx state=reloaded
This one just reloads service nginx.
Templates
Template functionality is implemented in a Ansible Core module Template. By convention, all templates find their place under templates directory. Firstly, we need to copy desired Nginx configuration to the target location. We saw the template task above in the task.yml.
And now we need to create that file:
#roles/nginx/templates/nginx.conf.j2
server {
        listen 80 default_server;

        root /usr/share/nginx/html;
        index index.html index.htm;
}
In this case nginix.conf do not use much of templating. But in the webpage we show we will use some hosts facts:
#roles/nginx/templates/index.html.j2
<html>
<head>
<title>First Ansible example </title>
</head>
<body>
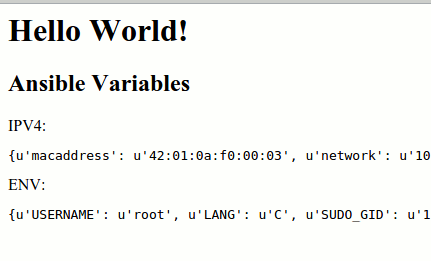
<h1>Hello World!</h1>
<h2>Ansible Variables</h2>
IPV4:
<pre>
{{ ansible_default_ipv4 }}
</pre>
ENV:
<pre>
{{ ansible_env }}
</pre>
</body>
</html>
Run it
Now we can provision GCE instance by executing:
ansible-playbook webserver.yml
Now we can see results in the browser.